


Forget training wheels. Seriously, just forget them. The toddler push bike—you’ll also hear it called a balance bike—is hands-down the best way to get your kid balancing, coordinating, and building real confidence on two wheels. It teaches them to find their own center of gravity right from the start, which makes the jump to a pedal bike feel like a natural next step, not a scary leap.
Why A Toddler Push Bike Is Your Secret Weapon
You've seen your toddler stumble around the house with that determined, wobbly gait. A push bike harnesses that exact energy and channels it into learning how to ride. Unlike tricycles or bikes with training wheels, which are basically crutches, a toddler push bike zeroes in on the single most important skill: balance.
By taking the pedals out of the equation, the bike forces your child to use their feet to push off and, crucially, to catch themselves and stay upright. This simple, brilliant design builds a foundation that goes way beyond just learning to ride.
Building More Than Just Balance
When your little one sits on that seat and scoots their feet, they're not just playing—they're firing up a whole-body learning machine. It’s a powerful mix of physical and mental exercise disguised as pure fun.
- Core Strength and Coordination: Pushing, steering, and staying upright all at once is a fantastic workout. It engages their core muscles, legs, and arms, giving their gross motor skills a serious boost.
- Spatial Awareness: Figuring out how to get around the leg of the dining table or over a crack in the sidewalk is a real-world physics lesson. It teaches them to judge space, speed, and how to react to their environment.
- Resilience and Confidence: Every little glide is a massive victory. They learn that a wobble isn't a failure; it's just part of figuring it out. That kind of resilience is a huge piece of the puzzle when it comes to building self-esteem in children.
There's a reason these pedal-free bikes are everywhere now. The global market was valued at USD 263 million in 2025 and is on track to hit USD 336 million by 2034. That’s because parents are seeing the results firsthand. In fact, studies show that over 65% of kids who start on a push bike learn to pedal a bike far more quickly than kids who start with training wheels.
Think of it this way: Training wheels teach a child how to pedal. A toddler push bike teaches them how to ride. One is just a mechanical motion; the other is a fundamental lesson in balance, control, and instinct.
The Long-Term Payoff
The benefits don’t just stop when they master the glide. That confidence they build on a push bike often carries over, making them more eager to try other sports and physical challenges. It's a fantastic introduction to understanding why sports for toddlers matter and how an early start can shape their entire attitude toward being active.
By choosing a toddler push bike, you’re not just buying another toy. You're investing in a tool that develops physical literacy and a genuine love for moving. You’re setting them up for a faster, frustration-free switch to a big-kid bike and, more importantly, nurturing a can-do spirit that will stick with them for years.
How To Choose The Perfect Toddler Push Bike
Picking out the right toddler push bike isn't about the flashy graphics or coolest-looking design. It really boils down to getting the perfect fit and solid, reliable function. Get this part wrong, and you're setting your kid up for frustration; get it right, and you're giving them a launchpad for a lifetime of confidence on two wheels.
Don't worry, this isn't rocket science. By focusing on just a few key details, you can easily find a bike that's less of a toy and more of an amazing developmental tool. Let's walk through what actually matters.
Forget Age And Focus On Inseam
Here’s the single most important thing to remember: inseam is everything. Age is just a number when it comes to bikes. You might have a tall two-year-old who needs a bigger bike than a more petite three-year-old, so forget what the box says about age ranges.
To get this magic number, have your child stand up straight with their feet slightly apart, wearing the shoes they’ll likely ride in. Then, just measure from the floor right up to their crotch. That's the inseam.
The golden rule: The bike's minimum seat height should be about one inch less than your child's inseam. This gives them that perfect "feet flat on the ground" stance with a slight bend in the knees—the sweet spot for control and confidence.
If they're on their tiptoes, the bike is too big. Period. They won't feel stable, and they won't want to ride.
The whole kids' bike market, especially for the 2-4 age group, is absolutely exploding. It was valued at a massive USD 22.48 billion in 2024 and is on track to hit USD 35.57 billion by 2035. Why? Because parents are seeing that skipping training wheels works. North America makes up about 40% of this market, full of families like ours trying to build active, outdoor habits.
Toddler Push Bike Sizing Chart
Use this chart as your guide, but always trust your tape measure over the "typical age." A direct inseam measurement is the only way to guarantee a perfect fit from day one.
| Inseam (Inches) | Recommended Minimum Seat Height (Inches) | Typical Age Range | Wheel Size (Inches) |
|---|---|---|---|
| 11 – 13" | 10 – 12" | 18 mo – 2 yrs | 12" |
| 13 – 15" | 12 – 14" | 2 – 3 yrs | 12" |
| 15 – 17" | 14 – 16" | 3 – 4 yrs | 12" or 14" |
| 17"+ | 16"+ | 4 – 5+ yrs | 14" or 16" |
Getting this right prevents so many headaches and makes the whole learning process fun instead of a fight.
Frame Material Matters
The frame is the bike's backbone, and what it's made of directly impacts how easy it is for your little one to handle. You'll mainly see two options: steel and aluminum.
- Steel Frames: These things are tanks. They're built to survive being thrown, dropped, and generally abused by a toddler. The trade-off? They're heavy. A heavy bike is a beast for a small kid to manage, especially when they have to pick it up themselves after a spill.
- Aluminum Frames: This is where you get a huge win in weight savings. An aluminum frame is so much lighter, making it incredibly easy for a toddler to maneuver and feel in control. This independence is a huge confidence booster. While they're still plenty durable, they might show dings and scratches more than steel.
For most kids, a lightweight aluminum frame is the way to go. The easier the bike is for them to handle, the faster they'll get the hang of it. And selfishly, it's a lot easier for you to carry back to the car. Speaking of hauling gear, if you're an active family, our guide to the best bed bike racks for trucks might come in handy for your own bike.
Tires: Foam Vs. Air
Don't overlook the tires. This choice affects both the ride quality and how much maintenance you'll be doing (or not doing).
- Foam Tires: Made from solid EVA foam, these are the definition of "set it and forget it." They are 100% puncture-proof and require zero attention. They’re great for riding around the house or on perfectly smooth pavement.
- Air-Filled Tires (Pneumatic): Just like the tires on your bike, these offer way better traction and cushioning. Think of them as the bike's built-in suspension system. They soak up bumps on sidewalks, roll smoothly over grass, and handle gravel paths with ease.
If your adventures won't go past the driveway, foam tires are perfectly fine. But if you plan on exploring parks, trails, or any remotely bumpy terrain, air-filled tires provide a much, much better ride.
This simple flowchart is a great gut-check for figuring out if your kid is even ready to start.
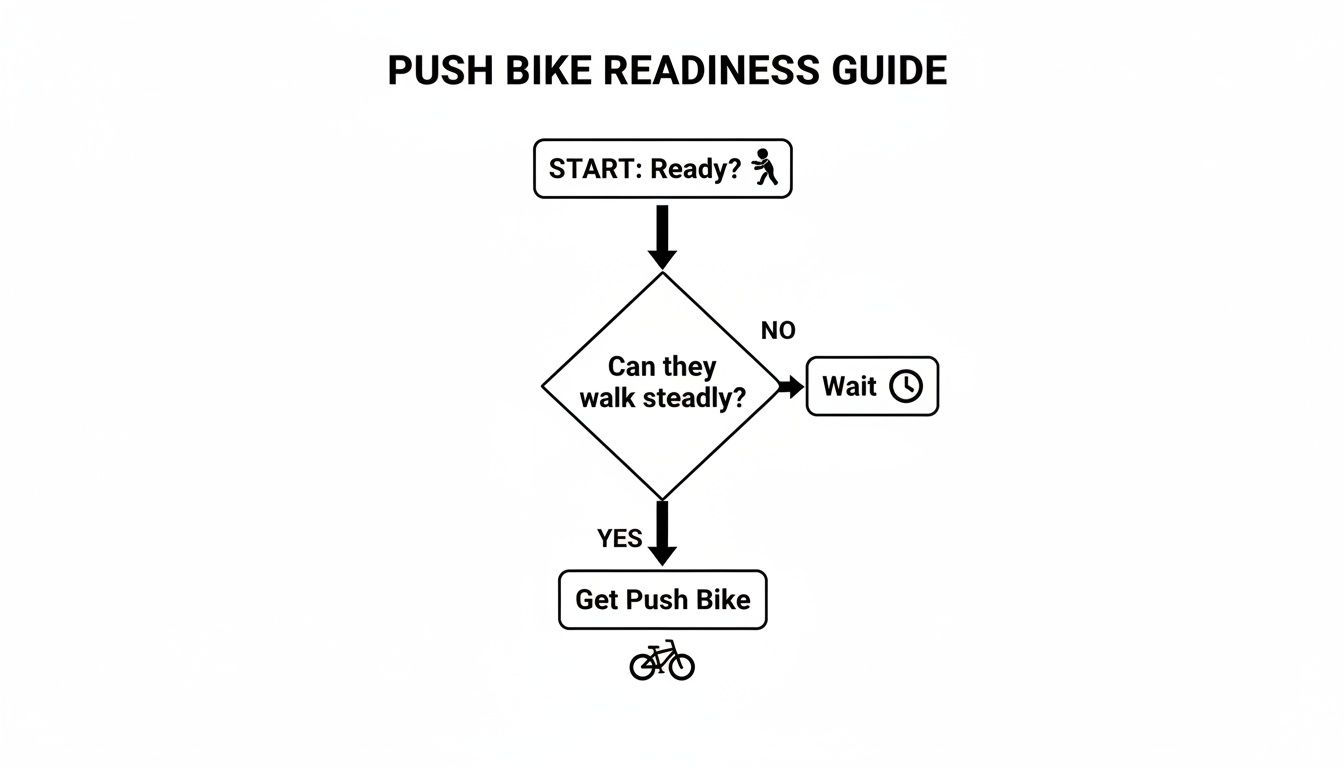
As you can see, it all starts with one simple milestone: steady, confident walking. Once they've got that down, they're ready to roll.
Non-Negotiable Features To Look For
Beyond the big three of inseam, frame, and tires, a few smaller details separate the great bikes from the just-okay ones.
Adjustability Is Key
Kids grow like weeds. Look for a bike with an adjustable seat and adjustable handlebars. This is what gives you years of use instead of just one season. Quick-release clamps are a fantastic bonus, letting you make adjustments on the fly at the park without digging for an Allen wrench.
Safety First
Give the bike a once-over for little safety details. Are the bolts recessed or capped with a rounded cover? You want to avoid anything that could scrape or scratch a bare leg. Some bikes also have a steering limiter, which is a nice feature that prevents the handlebars from spinning all the way around and causing a nasty jackknife fall. When you're trying to find the best fit for your child, it's always smart to consult an ultimate guide to choosing the perfect ride to see how these principles apply across different types of wheels.
Essential Safety Gear For The First Ride
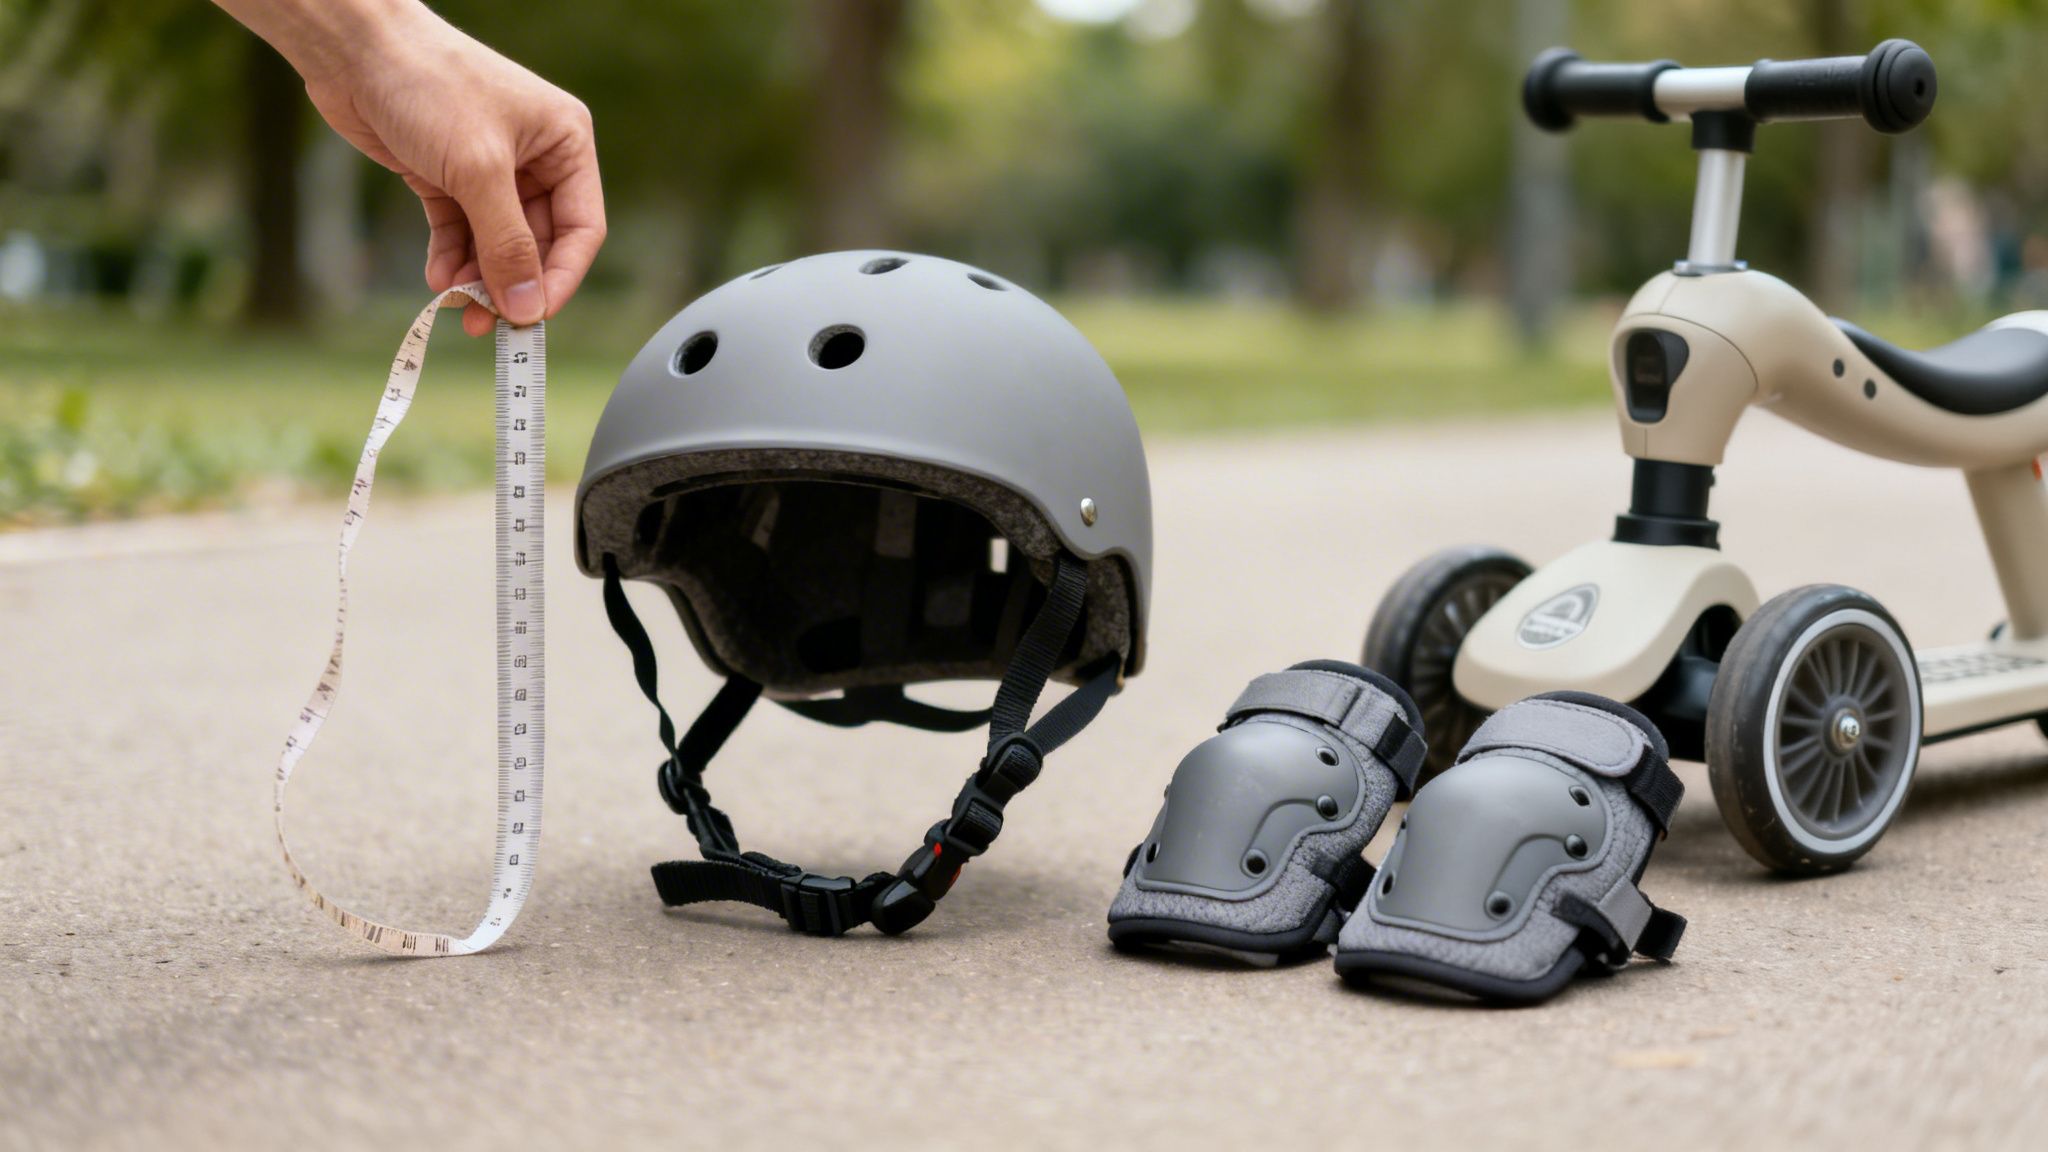
Before your little one even throws a leg over their new toddler push bike, our first job as dads is to gear them up right. This isn’t about turning them into a bubble-wrapped sumo wrestler; it’s about smart preparation and teaching a crucial lesson from day one: we play safe.
The helmet is the one piece of gear that is absolutely non-negotiable. It’s not just a good idea—it’s the rule. Tumbles are part of the game, even small ones, and a properly fitted helmet is the only thing standing between their head and the hard ground. Think of it just like buckling their car seat. No helmet, no ride. Simple as that.
Finding The Perfect Helmet Fit
Grabbing the first helmet you see on the shelf won't cut it. A helmet that's too loose or tilted back is almost as useless as not wearing one at all. Thankfully, getting a snug, secure fit only takes a minute.
- Measure Their Head: Grab a soft measuring tape and wrap it around the widest part of your toddler's head. This is usually about one inch above their eyebrows. Jot down that measurement.
- Check the Size: Every helmet has a size range printed right on it or its box. Your child's measurement should fall squarely in that range. Resist the urge to buy a bigger one for them to "grow into"—it won't protect them properly.
- Perform the Shake Test: Pop the helmet on and have them give their head a good shake from side to side. The helmet should stay put, not slide around. If it wobbles, it’s too big.
Look for a CPSC (Consumer Product Safety Commission) certification sticker inside. This is the US safety standard, and it's your guarantee that the helmet has been properly tested to withstand impact. It’s the seal of approval you want to see.
Other Essential Gear
While the helmet is the undisputed MVP, a few other pieces of gear can make the learning process a whole lot more fun and a lot less tearful. They take the sting out of the inevitable scrapes and bumps.
- Knee and Elbow Pads: These are your best defense against scraped-up knees and elbows, which are the most common battle scars from learning to ride. A simple set can give your kid a huge confidence boost, knowing a small fall is no big deal.
- Closed-Toe Shoes: Always, always have them wear sturdy shoes like sneakers. Flip-flops, sandals, or Crocs leave their little toes vulnerable to getting scraped on the pavement or caught under the bike.
This "safety first" mindset is a core part of being a dad, and it extends well beyond the bike path. To make sure you have all your bases covered, you can review our comprehensive car seat safety guidelines for peace of mind on every journey.
Creating A Safe Riding Zone
The right gear is only one part of the equation; the right environment is just as critical. Your driveway might seem like the easy choice, but it’s worth finding an ideal spot for a new rider.
Look for a location that is flat, smooth, and totally free of traffic. An empty tennis court, a smooth patch of blacktop at a local park, or a quiet cul-de-sac are perfect training grounds.
Before every ride, get into the habit of a quick two-second safety check on the toddler push bike. Make sure the tires have air (if they aren't foam), the seat clamp is tight, and the handlebars are secure. This simple ritual ensures their bike is as ready to roll as they are.
A Step-By-Step Plan For Teaching Your Toddler To Ride
Teaching your toddler to ride their new bike is all about celebrating the small victories. It’s not a race. The whole point is to make it feel like a game and build their confidence, turning any potential frustration into pure fun.
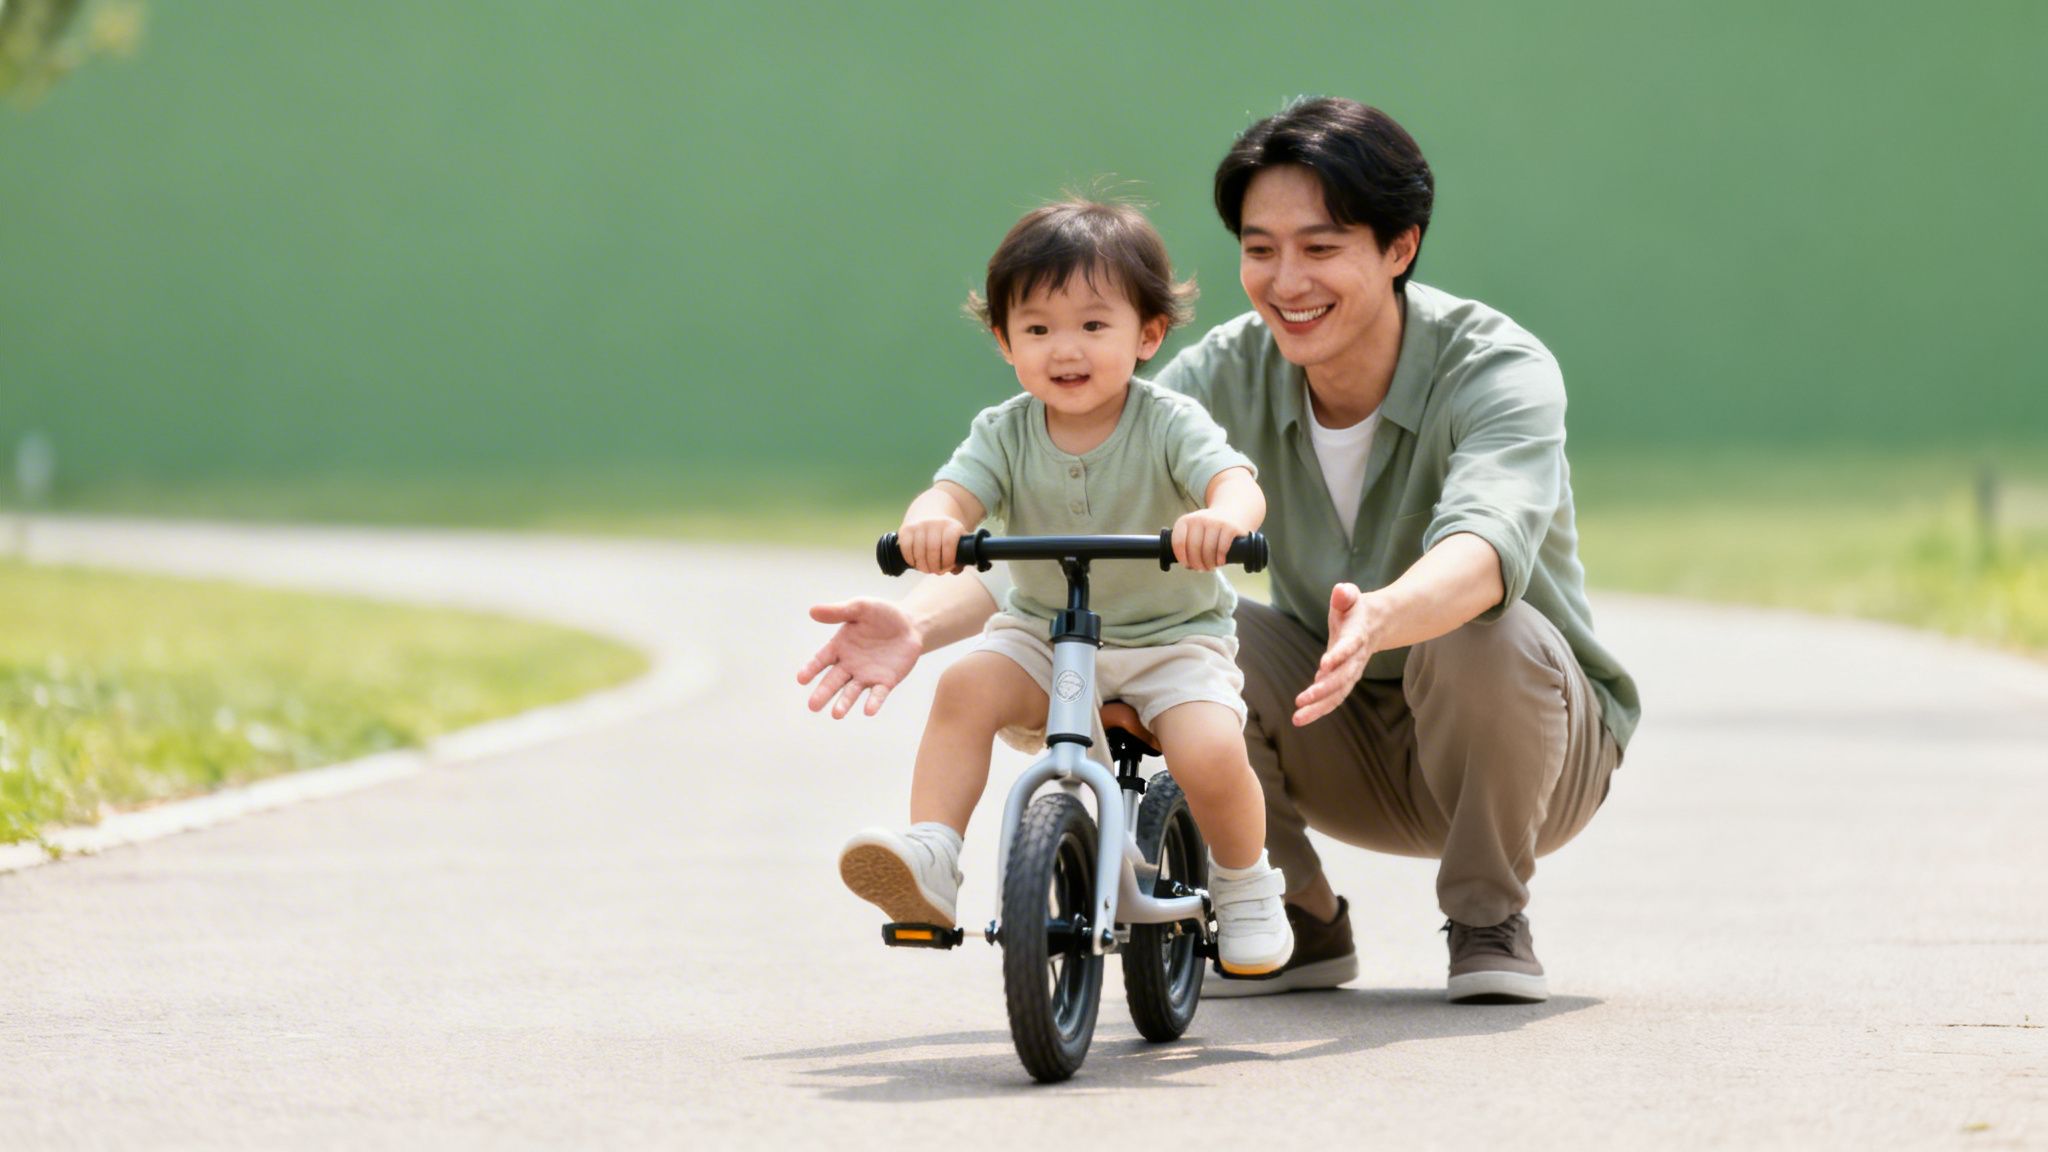
Fight every instinct you have to hold the back of the seat or give them a "helpful" push. The real magic of a toddler push bike is how it lets them figure things out on their own terms. This four-stage approach breaks it all down into simple, kid-friendly steps.
Stage 1 The Stand And Walk
First things first, forget about sitting. Just let your toddler stand over the bike frame with both feet planted firmly on the ground. This is their initial handshake with the bike—getting a feel for its weight and how the handlebars work.
They’ll probably start by just walking it forward. Encourage them to look ahead, not down at their feet, and give them plenty of praise. This stage is all about getting comfortable.
Coaching Tip: Your job is to be the cheerleader, not the engine. Let them feel how the bike moves under their own steam.
Stage 2 The Sit And Walk
Once they're happy walking with the bike, they’ll start lowering themselves onto the seat for a moment here and there. That’s a huge win! The goal now is to get them walking the bike while staying seated.
At first, their steps will be slow and clumsy. That's okay. They're learning how the bike feels with their full weight on the seat. Keep your sessions short and always end on a high note before they get tired.
Your number one job is to manage the environment. Find a large, flat, empty space like a tennis court or a smooth patch of blacktop. Getting rid of obstacles and uneven ground lets them focus completely on the bike.
Every step they take while seated is building the muscle memory they’ll need for gliding. Keeping them engaged is key, much like you do with activities for toddlers at home to keep things interesting.
Stage 3 The Run And Push
This is where it gets exciting. As they get more confident, their walking steps will get longer and faster, eventually turning into a run. They'll start taking bigger strides and—you'll see it—picking up their feet for a split second between pushes.
This is the "aha!" moment. It’s when they first feel the bike balancing itself. It's an incredible thing to watch. Cheer them on with things like "Big steps!" or "See how far you can go!"
- Common Pitfall: Don't yell "Lift your feet!" It just adds pressure and makes them nervous. Let them find it on their own. The feeling of the bike starting to balance is the best teacher there is.
- Actionable Tip: Turn it into a game. Set up little missions, like asking them to ride from the big tree to the bench. This gives them a purpose and keeps practice fun.
Stage 4 The Glide
The glide is the grand finale. It’s what happens when the "run and push" evolves into longer and longer stretches with both feet completely off the ground. Your kid has now officially cracked the code of balance.
The first glides might only be a few feet long. But soon, they’ll be pushing off, lifting their feet, and soaring across the pavement with a massive grin on their face. They'll even start learning to steer into turns and use their feet as a natural brake.
What To Avoid:
- Don't Push Them: Seriously, never push your child to make them glide. It completely takes away their sense of control and teaches them nothing about creating their own momentum.
- Don't Create A Finish Line: Keep the focus on the fun of the ride, not on racing to some imaginary finish line. The goal is for them to simply enjoy their toddler push bike.
By following these steps, you’re not just teaching them to ride a bike. You're handing them the keys to self-reliance and the thrill of figuring something out for themselves. You're their guide in a process of discovery, making sure their first memories on two wheels are awesome.
Transitioning From Push Bike To Pedal Bike
Let's be honest, the whole point of a toddler push bike is to eventually ditch it. It’s an amazing stepping stone, but its job is to make itself obsolete. Knowing exactly when to make that leap is the secret to a smooth, tear-free graduation to a “big kid” bike.
You don't need to circle a date on the calendar. Your kid’s own skills will send up the signal loud and clear. They’re telling you they're ready when they can consistently glide for long stretches—I'm talking 10-15 feet or more—with their feet up and off the ground. You'll also see a new level of confidence in their steering, where they can weave around a rogue sprinkler or a garden gnome while gliding, not just plodding along.
Signs Your Rider Is Ready To Level Up
When a toddler has truly mastered their push bike, it just looks… easy. Effortless. They've cracked the balance code. It's time to start thinking about pedals when you see these signs pop up again and again:
- Long, Confident Glides: They’re no longer just taking a few running steps and lifting. They are purposefully pushing off to build speed for a nice, long, controlled glide.
- Confident Steering and Control: Their head is up, scanning the path ahead, not staring down at their feet. They can easily steer where they want to go and maneuver the bike with real control.
- Braking with Feet: They instinctively know how to drag their feet to scrub off speed or come to a complete stop. This shows they understand how to manage their momentum.
- An Interest in Pedal Bikes: You’ll notice them pointing out older kids on pedal bikes, asking questions. That curiosity is a huge green light—it means they're internally motivated to level up.
Why You Must Skip The Training Wheels
Okay, lean in for this next part, because it’s critical: skip the training wheels altogether. I know it feels counterintuitive, but training wheels actively un-teach the most important skill your child just worked so hard to master on their push bike: balance.
Training wheels are a crutch. They teach kids to lean the wrong way in turns and prevent them from ever finding their own center of gravity. A kid coming from a push bike has already done the hard part. All they need to learn is how to pedal, not how to ride.
This focused, skill-first approach is exactly why so many parents are on board. The push bike market, which hit USD 1,057.90 million in 2025, is expected to almost double by 2035. It’s not just a fad; parents see it works. Studies show that 65% of balance bike users learn to ride a pedal bike significantly faster. If you're curious about the data behind this boom, you can learn more about the balance bike market growth.
A Dad-Approved Transition Plan
Making the switch is a small process, not a single afternoon event. The key is to make the new pedal bike feel as familiar as possible before you add the complication of pedaling.
The trick is to turn their new pedal bike into a temporary push bike. By simply taking off the pedals, you let your child get comfortable with the heavier frame and new feel using the skills they already have.
Here’s a simple, step-by-step game plan for a seamless switch:
- Get the Right Size: Just like with their first bike, make sure they can sit on the new seat with their feet flat on the ground. A good fit is non-negotiable for confidence.
- Remove the Pedals: Grab a wrench and take the pedals right off the new bike. This is the most important step! It lets them focus on balancing on the bigger, heavier frame without a new task.
- Practice Gliding and Braking: Let them scoot around on the pedal-less bike just like their old one. If the new bike has hand brakes, this is the perfect time to start teaching them how to use them gently.
- Re-attach One Pedal: Once they’re gliding and braking confidently, put just one pedal back on. This lets them get the feel for that circular pedaling motion with one foot while keeping the other free for balance.
- Go for Two Pedals: After they get the hang of it, add the second pedal. Hold the bike steady (don't hold the child!) and encourage them to push off and get both feet moving.
Be patient, keep it fun, and offer plenty of encouragement. Within a few short sessions, you’ll see that incredible "aha!" moment when it all clicks. And just like that, you'll have an official pedal bike rider—all thanks to the solid foundation built by that trusty little push bike.
Frequently Asked Questions
Alright, let's tackle the questions I know are on your mind. When you're buying new gear for your kid, you want to get it right the first time. Here are some no-nonsense answers to the most common things dads ask about toddler push bikes.
What Is The Best Age To Start A Toddler On A Push Bike
Most kids are ready to hop on a push bike somewhere between 18 months and 2 years old. But honestly, it's less about their birthday and more about their physical readiness.
Forget the calendar and look for two key signs. First, are they walking with confidence? A steady walk means they have the basic motor skills down. Second, can they sit on the bike with the seat at its lowest and plant both feet flat on the ground, with their knees slightly bent? If you can say yes to both, they're good to go.
Are Air Tires Or Foam Tires Better For A Push Bike
This is a classic "it depends" situation, and it really comes down to where your little one will be riding. Each tire type has its clear pros and cons.
Foam Tires: These are your zero-maintenance, never-go-flat option. They're awesome if the bike will live mostly indoors or be used on super smooth surfaces like your patio or a perfect driveway.
Air Tires: Just like on your bike, these pneumatic tires give you way more grip and cushioning. This translates to a much smoother ride over bumpy sidewalks, grass, or gravel paths. For any real outdoor adventures, air tires are the clear winner for comfort and capability.
The bottom line: Go with foam for a puncture-proof, indoor-friendly bike. But for exploring the great outdoors and tackling any surface with a smoother ride, you’ll want a toddler push bike with air tires.
How Long Will A Toddler Use A Push Bike
You'll typically get a good one to three years of use out of a push bike. If a toddler starts around age two, they're often ready to graduate to a pedal bike by the time they're three or four.
Think of it this way: one bike gets them all the way from toddling to pedaling. It’s a fantastic value, especially when you compare it to the old way of buying a tricycle and then a separate bike that needs training wheels.
Do We Really Need To Skip Training Wheels
Yes. Absolutely. If you want the fastest, smoothest transition to a real pedal bike, skip the training wheels entirely. They're a crutch that actually teaches bad habits.
Training wheels force a kid to lean the wrong way when turning and, most importantly, they prevent them from learning how to balance. A kid who has mastered a push bike already has that core skill dialed in. Putting them on training wheels would just be a frustrating step backward.
At Alpha Dad Mode, we believe in giving dads the practical tools and straightforward advice they need to lead with confidence. Explore more guides and tips to master every stage of fatherhood at https://alphadadmode.com.