


There’s something satisfying about bringing an old tool back to life.
Maybe it’s the fact that we’re fixing something instead of throwing it away. Maybe it’s the smell of fresh hickory. Or maybe it’s because spending $25 on a new handle feels better than spending $100 on a new axe.
Whatever the reason, Axe Handle Replacement is one of the most rewarding DIY projects a dad can tackle.
I live on an old dairy farm, and every year I cut and split firewood for our indoor wood heater. I’ve gone through more axes than I’d like to admit. Some handles cracked. Some loosened up. A few met their end after I missed the log and introduced the handle to solid oak at full speed.
Not my proudest moments.
But replacing a handle is often easier than most people think, and a properly restored axe can easily become your favorite tool again.
If you’re looking to learn Axe Handle Replacement, this guide will walk you through everything you need to know.
Why Axe Handle Replacement Is Worth Doing
Many people throw away perfectly good axe heads because the handle fails.
That’s a mistake.
In many cases, the steel head is still in excellent condition.
A quality axe head can last generations if properly maintained.
The handle?
That’s a wear item.
Think of it like replacing tires on a truck.
You don’t chuck the whole truck because the tires wore out.
The same principle applies here.
Benefits of replacing the handle include:
- Saving money
- Preserving older tools
- Improving performance
- Customizing handle length
- Extending the life of quality steel
And let’s be honest.
An old axe with a freshly fitted hickory handle just looks epic.
Signs Your Axe Handle Needs Replacing
Sometimes the answer is obvious.
If your handle snaps in half, you’ve got your answer.
Other times the warning signs are more subtle.
Look for:
Cracks
Even small cracks can become dangerous.
Loose Axe Heads
If the head moves at all, it needs attention.
Rot
Common in axes stored outdoors.
Splintering
Especially around the eye of the axe.
Severe Wear
Years of use eventually take their toll.
When in doubt, replace it.
A flying axe head is a terrible way to improve your day.
Choosing the Right Replacement Handle

Not all handles are created equal.
Some are excellent.
Others seem to have been manufactured specifically to test your patience.
Hickory
The gold standard.
Strong.
Durable.
Shock resistant.
This is my preferred choice.
Ash
Popular in Europe and still a solid option.
Fiberglass
Durable and weather resistant.
Not traditional, but effective.
Composite Materials
Extremely tough but often lacking the feel of wood.
For most dads looking to restore a traditional axe, hickory remains hard to beat.
Comparison Table: Handle Materials
| Material | Durability | Shock Absorption | Appearance | Ease of Replacement |
|---|---|---|---|---|
| Hickory | Excellent | Excellent | Traditional | Easy |
| Ash | Very Good | Very Good | Traditional | Easy |
| Fiberglass | Excellent | Good | Modern | Moderate |
| Composite | Excellent | Good | Modern | Moderate |
For splitting firewood around my farm, hickory wins every time.
Tools You’ll Need
A successful Axe Handle Replacement doesn’t require a professional workshop.
Basic tools include:
- Hammer
- Punch
- Wood rasp
- Sandpaper
- Vice
- Hand saw
- Safety glasses
- Replacement handle
- Wooden wedge
- Metal wedge (optional)
Most homeowners already own much of this equipment.
Removing the Old Handle
This is where the fun begins.
Or frustration.
Depends on how stubborn the old handle feels that day.
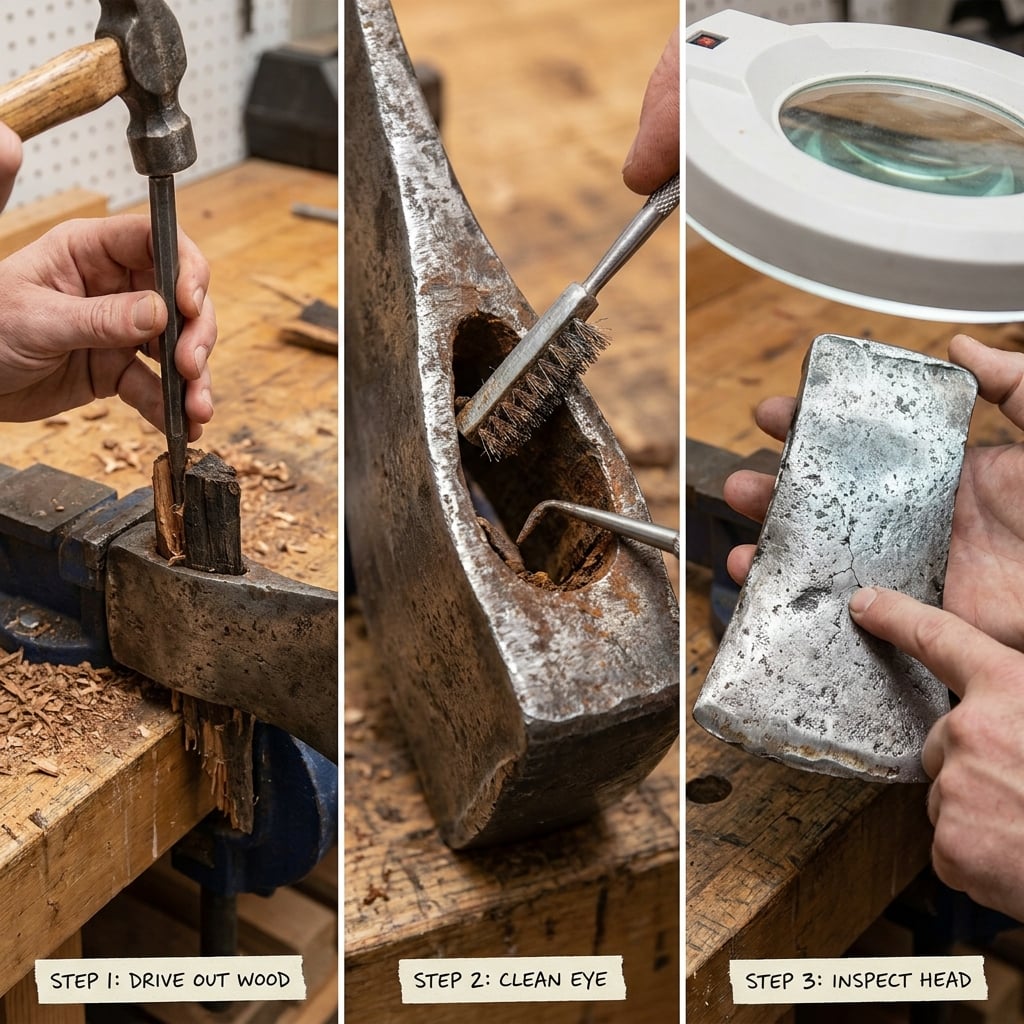
Step 1: Remove Remaining Wood
Drive out as much old wood as possible using a punch.
Step 2: Clean the Eye
The eye is the opening where the handle fits.
Remove:
- Old wedges
- Dirt
- Rust
- Debris
The cleaner the eye, the better the fit.
Step 3: Inspect the Axe Head
Look for:
- Cracks
- Chips
- Excessive wear
If the steel is compromised, replacing the handle won’t solve the problem.
Fitting the New Handle
This is the most important stage.
And the stage where many people rush.
Don’t.
A proper fit determines whether your axe lasts years or becomes tomorrow’s problem.
Test Fit First
Slide the handle into the eye.
It should be snug.
Not loose.
Not forced.
Remove Small Amounts at a Time
Use a rasp or sandpaper.
Work slowly.
You can always remove more material.
Adding it back is considerably harder.
Installing the Handle
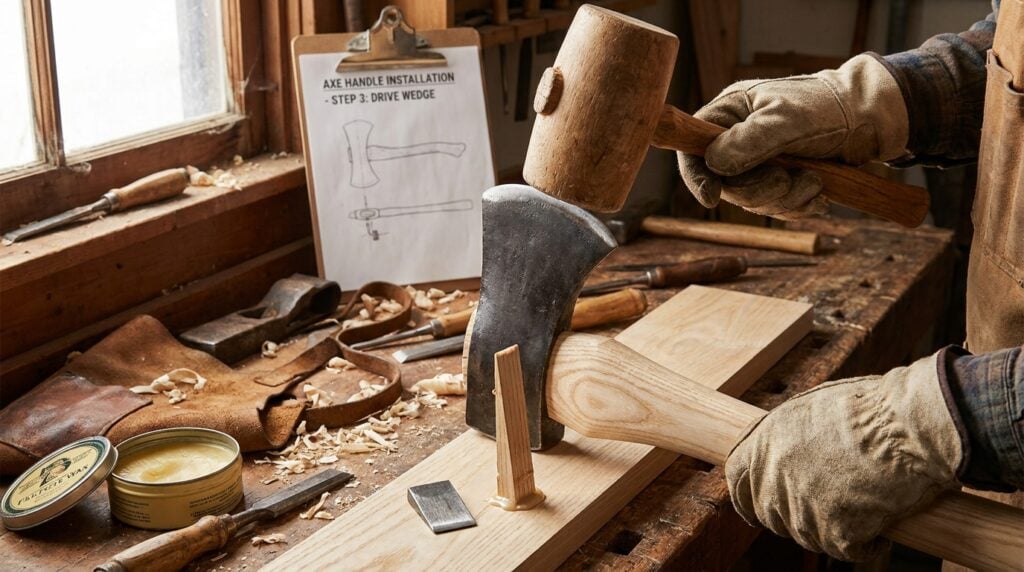
Once you’re happy with the fit:
Seat the Axe Head
Tap the handle carefully until fully seated.
Insert the Wooden Wedge
Apply wood glue if desired.
Drive the wedge firmly into the kerf.
Trim Excess Material
Cut flush with the top.
Add Metal Wedge
Optional but often recommended.
This provides additional security.
Done correctly, the axe head should feel rock solid.
Common Axe Handle Replacement Mistakes
I’ve made most of these at least once.
You don’t have to.
Removing Too Much Wood
The most common error.
A loose fit rarely improves.
Using Poor Quality Handles
Cheap handles often become expensive lessons.
Ignoring Grain Orientation
Straight grain is stronger.
Always inspect before installation.
Skipping Safety Checks
A loose axe head can become extremely dangerous.
Always test thoroughly before use.
Wood Selection Matters More Than You Think
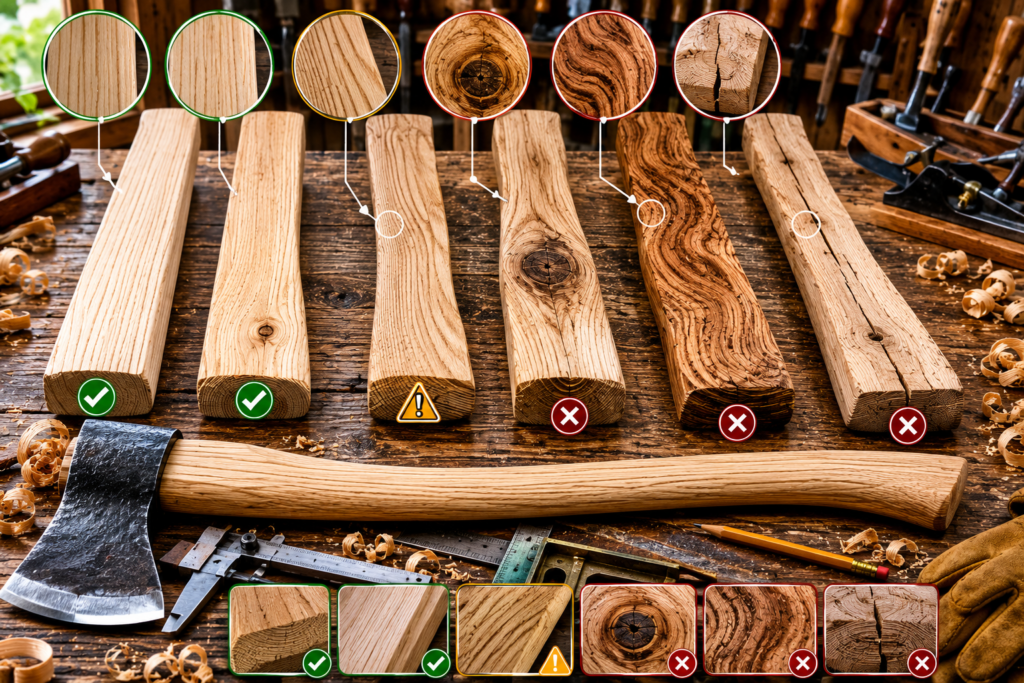
One lesson I’ve learned after years of splitting firewood:
Grain matters.
A lot.
According to experts from the US Forest Service Forest Products Laboratory, straight-grained wood generally offers better strength and durability characteristics than wood with significant grain runout.
Look for:
- Straight grain
- Minimal knots
- Consistent density
Avoid:
- Large knots
- Wild grain patterns
- Visible defects
Pretty wood isn’t always strong wood.
Restoring Vintage Axes
This is where things get interesting.
Older axes were often made from outstanding steel.
In many cases, better than what you’ll find on budget tools today.
Organizations such as the American Bladesmith Society provide extensive information about steel quality and blade craftsmanship.
Many vintage heads deserve restoration.
A proper Axe Handle Replacement can transform a rusty relic into a reliable working tool once again.
Safety Considerations
Let’s talk safety.
Not because it’s exciting.
Because emergency room visits are expensive.
Before using your restored axe:
Check the Head
No movement whatsoever.
Inspect the Wedge
Ensure it’s fully seated.
Wear Safety Equipment
At minimum:
- Eye protection
- Gloves
- Boots
Test Carefully
Start with light swings.
Don’t immediately attack the largest log.
Your axe deserves a proper warm-up.
So do your shoulders.
Caring for Your New Axe Handle
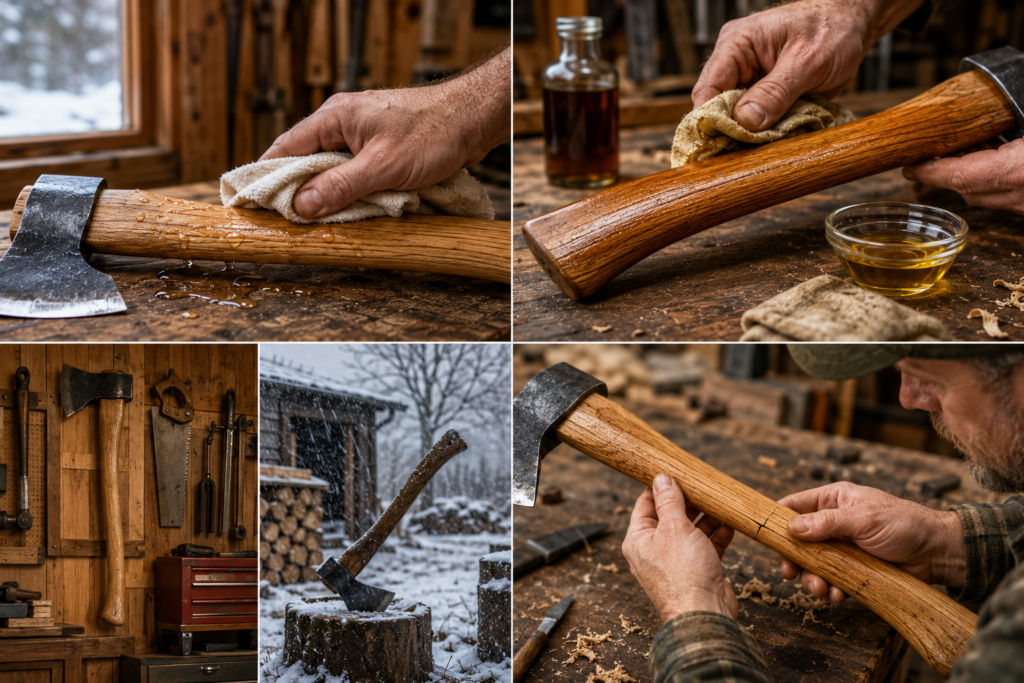
A little maintenance goes a long way.
Keep It Dry
Moisture causes problems.
Apply Linseed Oil
Many experienced woodsmen recommend boiled linseed oil for wooden handles.
The University of Kentucky Forestry Extension offers useful information about wood care and preservation.
Store Indoors
A shed is good.
A garage is better.
Leaving it outside all winter is not ideal.
Inspect Regularly
Small issues are easier to fix than major failures.
Why I Still Prefer a Good Wooden Handle
I’ve used fiberglass.
I’ve used composite.
They work.
But a properly fitted hickory handle still feels better in my hands.
Maybe it’s tradition.
Maybe it’s balance.
Maybe it’s because I’ve spent years cutting wood and developed a stubborn attachment to wooden handles.
Whatever the reason, I keep coming back to hickory.
There’s simply something satisfying about it.
Related Gear for Working Dads
If you’re spending time in the workshop or splitting firewood, you might also enjoy:
- Our guide to choosing the right Table Saw Rip Fence
- Our review of the best Flannel Shirt Hooded Jackets
Both pair surprisingly well with a stack of firewood and questionable weather.
Pros and Cons of Axe Handle Replacement
Pros
| Pros | Why It Matters |
|---|---|
| Saves Money | Much cheaper than buying a new axe |
| Preserves Quality Tools | Older steel often deserves saving |
| Customizable | Choose your preferred handle length |
| Satisfying Project | Great DIY experience |
| Sustainable | Reduces waste |
Cons
| Cons | Reality |
|---|---|
| Takes Time | Proper fitting requires patience |
| Learning Curve | First attempts may not be perfect |
| Requires Basic Tools | Some equipment needed |
| Cheap Handles Can Fail | Quality matters |
Overall?
The advantages greatly outweigh the drawbacks.
Frequently Asked Questions
How difficult is Axe Handle Replacement?
Most homeowners can complete the project with basic tools and patience.
What wood is best for axe handles?
Hickory is generally considered the top choice due to its strength and shock resistance.
How long does Axe Handle Replacement take?
Typically between one and three hours depending on experience and fitment.
Can I replace an axe handle without special tools?
Yes. Most projects require only basic workshop tools.
Should I use glue with the wedge?
Many people do, although a properly fitted wedge can hold securely on its own.
Are fiberglass handles better than wood?
They are more weather resistant, but many users still prefer the feel and performance of wood.
Is it worth restoring old axes?
Absolutely. Many vintage axe heads are made from excellent steel and perform exceptionally well after restoration.
Before You Buy a New Axe…
A quality Axe Handle Replacement can breathe new life into a trusted tool.
As someone who lives on an old farm and splits wood every winter, I’ve learned that a good axe becomes more than just a tool.
It becomes part of the routine.
Part of the season.
Part of the work that keeps a home warm.
Replacing a broken handle isn’t complicated, but it does require patience.
Take your time.
Fit it properly.
Choose quality materials.
Do that, and there’s a good chance your old axe will become your favorite tool again.