

When you get a flat, the actual work of swapping the tire is pretty straightforward. You secure the car, loosen the lug nuts, jack it up, and put on the spare. But the real secret? Prioritizing safety first. Before you even lay a hand on a tool, your main job is to make sure your car isn't going anywhere and that you're visible to other drivers.
Your Essential Roadside Safety Checklist
Before you start wrestling with lug nuts, you need to become the safety captain for your little roadside operation. A flat tire on a busy road isn't just an annoyance—it's a genuinely dangerous situation. Spending a few moments to secure the area can keep a bad day from getting a whole lot worse. This isn't just about checking boxes; it's about keeping yourself and your family safe.
The second you feel that awful thump-thump-thump of a flat, your only goal is to get off the road safely. Don't panic and slam the brakes. Just ease off the gas, signal, and find a safe place to pull over. A wide shoulder or an empty parking lot is perfect. Whatever you do, try to avoid stopping on a curve, a steep hill, or soft ground where the jack could sink or slip.
Once you've found a good spot on solid, level ground, throw the car in park and pull the emergency brake. This is non-negotiable. Next, hit those hazard lights immediately. Even on a bright sunny day, flashing lights are the universal sign for "hey, something's wrong here, slow down."
Assembling Your Roadside Toolkit
True preparation means having the right gear on hand long before you need it. Your car probably came with a basic kit, but it’s always a good idea to check it out and maybe make a few smart upgrades. This is your roadside go-bag.
- Reliable Jack: The standard-issue scissor jack will do the job, but they can be wobbly. A small hydraulic bottle jack is a fantastic, stable upgrade.
- Proper Lug Wrench: That little L-shaped wrench in the trunk? It's often barely up to the task. A four-way or telescoping lug wrench gives you way more leverage, which you'll be thankful for when dealing with stubborn, over-tightened nuts.
- Wheel Chocks: These are crucial for making sure your car doesn't decide to roll away. No chocks? A big rock or a solid piece of wood will work in a pinch.
- Fully Inflated Spare: Seriously, check your spare tire's pressure every few months. There's nothing worse than discovering your spare is also flat. It usually needs to be inflated to 60 PSI.
A powerful headlamp and a decent pair of work gloves are two of the most overlooked heroes of any car's emergency kit. They turn a fumbling, frustrating job in the dark into a manageable task, all while keeping your hands clean and letting you see what you're doing.
Creating a Safe Zone
Okay, your vehicle is secure. Now it's time to warn other drivers. If you've got reflective triangles or flares, set them up behind your car. A good rule is to place one about 10 feet back, another at 100 feet, and if you're on a busy road, a third one even farther out. This gives oncoming traffic plenty of time to see you and move over. You'll find more practical advice like this in our complete dad car guide.
Finally, get everyone who isn't helping with the tire change to a safe spot, far away from the road. If there's a guardrail, have them stand behind it. Their safety is just as important as yours. Once you've handled these prep steps, you can finally focus on the tire itself without constantly looking over your shoulder.
The Complete Process for Changing a Flat Tire
Alright, you've established a safe zone and the car is properly secured. Now for the hands-on part. Don't worry, this isn't rocket science, but getting the sequence right is the key. Follow these steps, and you’ll turn a roadside hassle into a moment of victory.
Here’s a pro-tip right out of the gate that’ll save you a ton of frustration: loosen the lug nuts before you lift the car. Seriously. Trying to break loose a stubborn nut while the wheel is dangling in the air is a masterclass in wasted effort and scraped knuckles. With the car's weight on the tire, the wheel won’t spin, letting you use your own weight as leverage.
Before you even grab a tool, your first priority is making sure your workspace is secure.
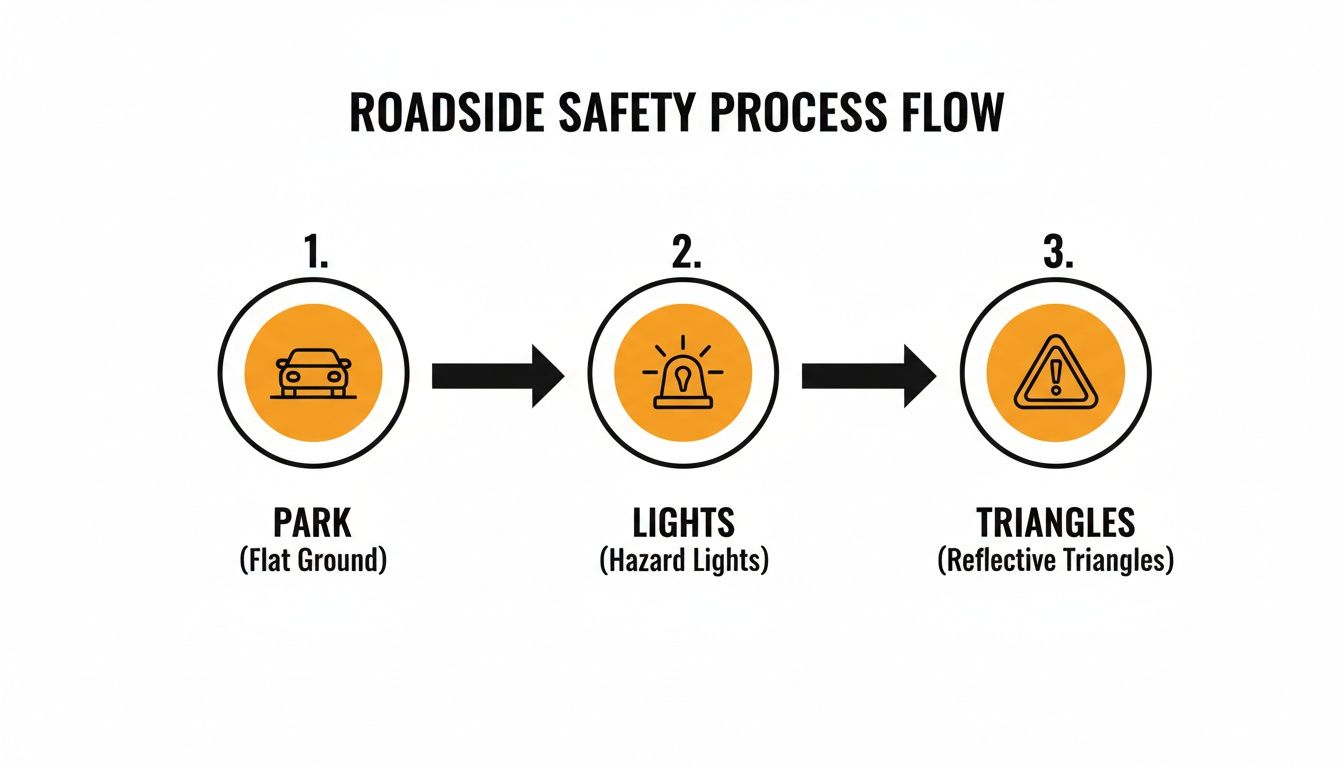
This simple flow—park safely, turn on the hazards, and set out reflective gear—is non-negotiable. Safety first, always.
Breaking Loose the Lug Nuts
If you’ve got a hubcap covering the lug nuts, pop it off. The flat end of your lug wrench is usually perfect for prying it off without causing any damage. With the nuts exposed, get the wrench fitted securely onto one of them.
Now, turn the wrench counter-clockwise to loosen it. Remember the old saying, "righty-tighty, lefty-loosey." You might have to put some real muscle into it, especially if they haven't been touched in a while. Don't be afraid to carefully use your foot for extra power, but be steady.
Just "break" them loose with about a half-turn—don't unscrew them completely just yet.
Finding the Right Jacking Point and Lifting
This is where you need to pay close attention. Jacking up your car from the wrong spot can cause serious, expensive damage to the frame. Your owner's manual is your best friend here; it will have a diagram showing the exact, reinforced jacking points.
Typically, you're looking for a small notch or a pinch weld on the vehicle's frame, usually located just behind a front wheel or in front of a rear one. It's a specific spot designed to handle the car's full weight.
Crucial Tip: Never, ever place the jack under a plastic bumper, the oil pan, or the transmission. These parts are not built to support the vehicle's weight and will crack or get crushed.
Once you’ve found the right spot, slide the jack underneath and start raising it until it makes firm contact. Before you lift the car, do a quick visual check to make sure the jack is flat on the ground and sitting squarely under the jacking point.
Now, slowly and steadily crank the jack to lift the vehicle. You'll want to raise it until the flat tire is about six inches off the ground. This gives you plenty of room to get the flat off and slide the fully inflated spare on.
Swapping the Old Tire for the New
With the car safely in the air, you can now finish unscrewing the lug nuts. Take them all the way off and put them somewhere they won't roll away—an upside-down hubcap works great as a temporary bowl.
Grip the flat tire with both hands and pull it straight toward you, off the wheel studs. It's probably heavier than you think, so get a solid stance. Lay the flat tire down on the ground so it can't roll into traffic.
Next, grab your spare. Line up the holes on the spare with the wheel studs. This part can be a little awkward; try lining up the bottom hole with the bottom stud first, then use your foot to hold the tire in place while you align the rest. Push the spare on until it sits flush against the hub.
Securing the Spare and Lowering the Vehicle
Take your lug nuts and start threading them back onto the studs by hand. This is important—it prevents you from cross-threading and damaging the studs. Hand-tighten all of them until they feel snug.
Now, you can slowly and carefully lower the car. Turn the jack's release valve or crank it the other way until the spare tire is resting completely on the pavement. With the car's weight back on the wheel, you can remove the jack completely.
The final, critical step is to fully tighten the lug nuts. Don't just tighten them in a circle. You need to use a star pattern to make sure the wheel seats evenly. Tighten one nut, then move to the one directly across from it, then back across, and so on. Give the wrench a good, firm pull on each nut until they're all secure.
To help keep the process straight, here's a quick cheat sheet.
Quick Reference Tire Change Procedure
This table breaks down the entire process into manageable phases, outlining what you need to do and why it's important.
| Phase | Action | The 'Why' Behind It |
|---|---|---|
| Preparation | Loosen lug nuts before lifting. | Uses the car's weight to keep the wheel from spinning, making it much easier to break the nuts loose. |
| Lifting | Locate the reinforced jacking point and lift the car about 6 inches off the ground. | Prevents damage to the car's frame and provides enough clearance to swap the tires. |
| Swapping | Remove the flat, mount the spare, and hand-tighten the lug nuts. | Ensures the new wheel is seated properly before bearing any weight. Hand-tightening prevents cross-threading. |
| Securing | Lower the car completely, then use the wrench to tighten lug nuts in a star pattern. | Guarantees the wheel is mounted flush and evenly against the hub for safe driving. |
Following these steps in order turns a stressful situation into a manageable task.
Mastering this skill isn’t just about convenience; it’s a valuable piece of self-reliance. In fact, professional tire service is a huge industry. In the U.S., California alone employed over 10,160 tire repairers in 2023, and the global market for tire changing equipment is projected to hit USD 928.2 million by 2032. You can learn more about this by exploring insights on Fortune Business Insights.
Once everything is tight, gather your tools, stow the flat tire in your trunk, and don't forget to pick up your wheel chocks. You did it.
Troubleshooting Common Roadside Problems
In a perfect world, a tire change happens on a clean, flat surface on a sunny day. Back in reality, it rarely goes down that smoothly. You're far more likely to be wrestling with a rusted-on lug nut or staring at a soft, muddy shoulder where your jack needs to go.
This is where experience kicks in, turning a potential disaster into a minor delay. Think of this as your playbook for the curveballs the real world throws at you. Knowing how to adapt is what gets you back on the road without calling for a tow.
Conquering the Stubborn Lug Nut
It's the most common—and infuriating—roadblock. You put your weight on the lug wrench, and… nothing. The nut is frozen solid, either from a tire shop's overzealous impact wrench or just plain old rust.
Don't just pull harder; it's time to work smarter. Your first move is to get better leverage. The little L-shaped wrench that comes with most cars just doesn't have the muscle. A four-way cross wrench or a telescoping lug wrench gives you a much longer handle, which multiplies the force you can apply.
If it still won't give, try these field-tested tricks:
- Use Your Foot (Carefully): Position the wrench so it’s horizontal and parallel to the ground. Then, apply steady, firm pressure with your foot. Don't jump on it—that's a good way to slip, strip the nut, or send the wrench flying.
- Bring in a Liberator: A small can of penetrating lubricant like WD-40 or PB Blaster is a true lifesaver to keep in your trunk. Spray it directly onto the seam where the lug nut meets the stud. Let it soak in for 5-10 minutes to work its way into the threads before you give it another go.
Quick Tip: After you get the nut off, wipe any excess lubricant from the wheel studs before you put the spare on. You need a clean, dry surface to make sure you can tighten the new lug nuts properly.
Interestingly, this whole process is a relatively modern skill. The need for reliable tire changes really took off after WWII, when Michelin’s new radial tires hit the market in the 1940s. They were a game-changer, cutting blowouts by an incredible 70%, but they also made it clear that every driver needed a solid plan for flats. Today, the global tire market trends from Michelin show just how vital this simple component still is.
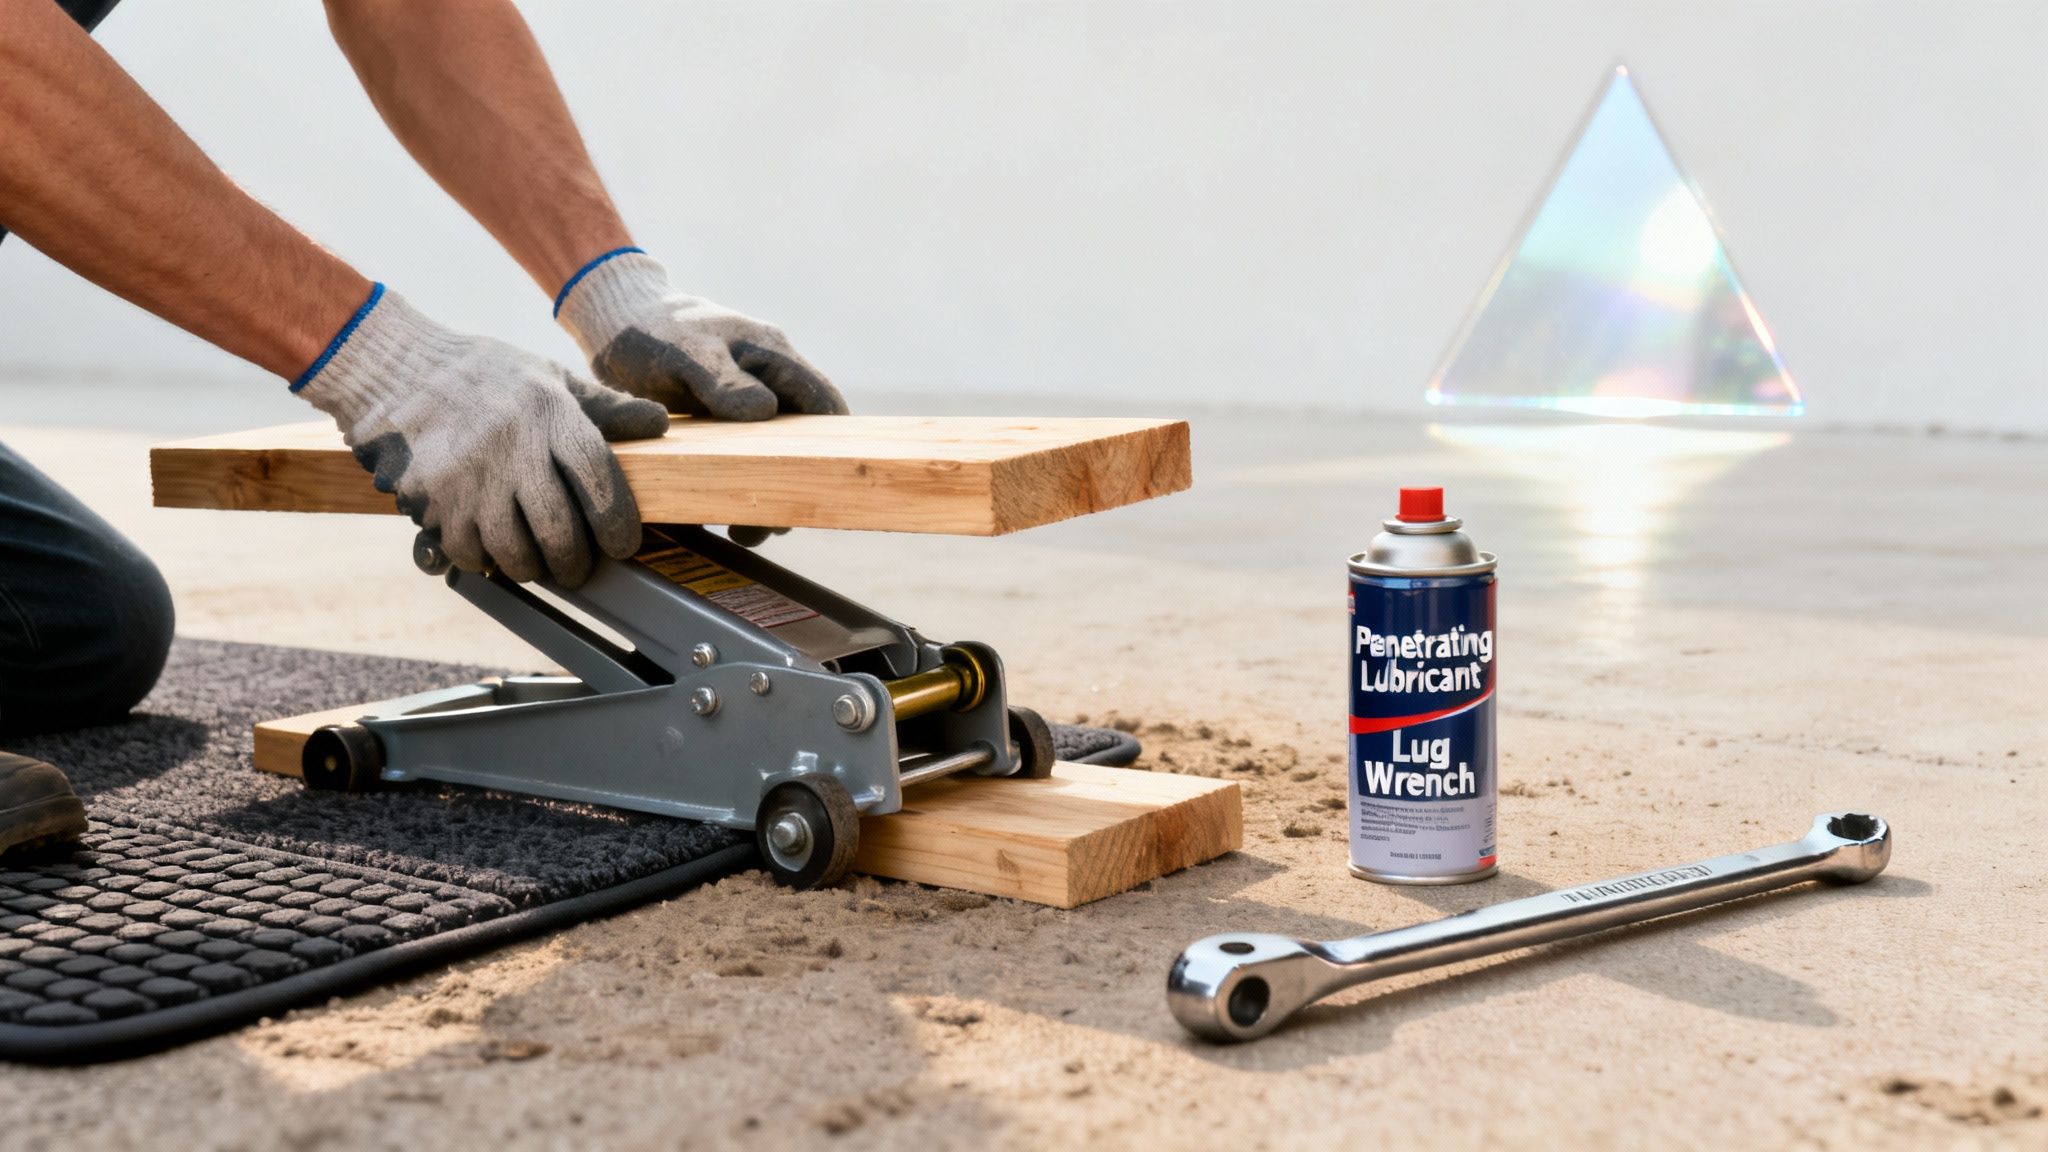
When the Ground Is Unstable
You've found a safe spot to pull over, but it's on a soft patch of grass or a gravelly shoulder. If you put your jack directly on that surface, it’s going to sink as soon as it takes the car's weight. That's not just ineffective; it's dangerous, as the car could become unstable and slip right off the jack.
The fix is simple: give the jack a solid, stable base to stand on. You need something to distribute the vehicle’s weight over a wider area.
Here are a few things that work great:
- A Small Piece of Wood: Tossing a small, flat piece of 2×6 lumber in your trunk is the best-prepared solution. It's the perfect jack stand.
- Your Floor Mat: In a real pinch, a heavy-duty rubber floor mat can work. Grab one from the passenger or back seat—never the driver's side—to create just enough of a platform to keep the jack from digging in.
Whatever you use, make sure the jack is centered on it and stays perfectly vertical as you raise the vehicle. Keep a close eye on it for any tilting or shifting.
Dealing with Spare Tire Surprises
So you did everything right, got the spare mounted, and as you're about to lower the car, you notice the "donut" looks a bit deflated. It's a common problem. Spare tires lose air just sitting there, often 1-2 PSI every month.
If it's just low, you can usually drive slowly to the nearest gas station and fill it to the recommended pressure, which is often a high 60 PSI for temporary spares (check the tire's sidewall). If it's completely flat, though, you’re stuck. That's a job for roadside assistance.
You also need to know if your car has run-flat tires. These are built with tough, reinforced sidewalls that let you keep driving for a bit after a puncture—usually about 50 miles at under 50 mph. If you have run-flats, your car probably didn't come with a spare tire or a jack at all. Your job isn't to change the tire, but to drive cautiously to the nearest service center for a proper repair or replacement.
What to Do After the Spare Is On
Alright, the spare is on. Take a second to appreciate that you just handled business. But hold off on the victory lap—you're not quite done yet.
Getting the spare on is the hard part, but these next few steps are what really get you back on the road safely. Think of that spare, especially if it’s a small “donut,” as a temporary patch. A get-out-of-jail-free card, not a permanent solution.
First things first, let's clean up the scene. You don't want to drive off and leave your jack on the shoulder of the highway. Gather up the jack, lug wrench, and wheel chocks and put them back where they belong. The flat, grimy tire can go in the trunk where the spare used to live.
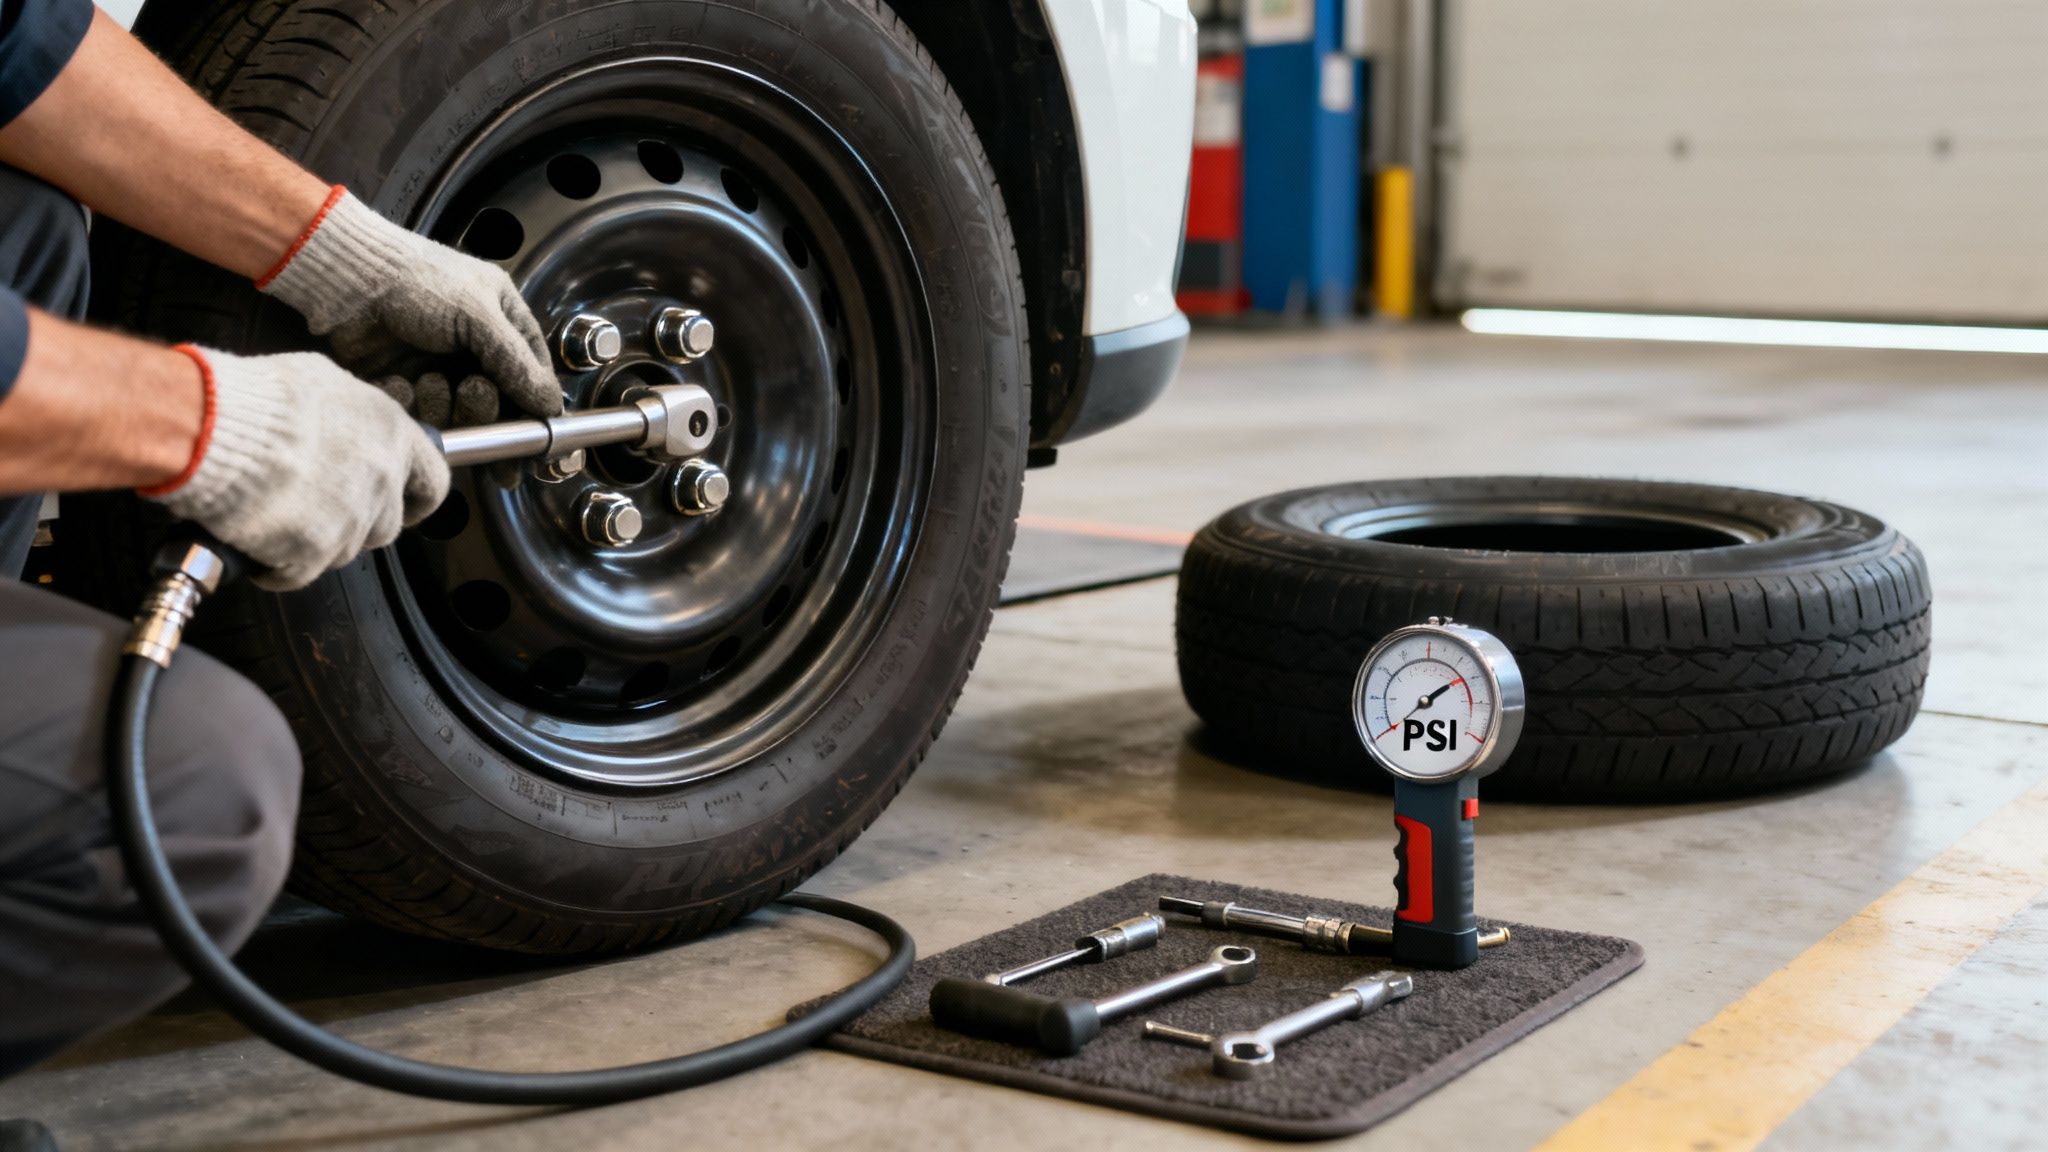
Check the Spare Tire Pressure Immediately
Your very next stop should be a gas station with an air pump. I mean it. Spares sit in the trunk for years, and they lose air just like any other tire. It's almost a guarantee that it’s underinflated.
This is especially critical for those little donut spares. They’re designed to run at a much higher pressure than your regular tires, often around 60 PSI. Driving on one that’s low on air is asking for trouble—it messes with your car's handling and braking in a big way.
Where do you find the right pressure? It’s stamped right on the sidewall of the spare tire itself, or you can find it in your owner's manual. Never guess. Taking five minutes to air it up properly makes the drive to the tire shop infinitely safer.
Understand the Limitations of a Donut Spare
Most cars these days have a temporary "donut" spare to save trunk space. You need to treat this thing with respect, because it is not a real tire. It has serious limitations, and ignoring them is a gamble.
Keep these two numbers burned into your brain:
- Don't drive over 50 mph. The donut is not built for highway speeds. Pushing it too fast can cause it to overheat and fail spectacularly.
- Don't drive more than 50 miles. Its only job is to get you from the side of the road to the nearest tire shop. It’s not meant to get you to work all week.
Your car will feel different, too. It won't corner as well, and your braking distance will increase. So slow down, take turns gently, and give the car in front of you plenty of extra space.
The donut is a lifesaver, but it's just a temporary one. If you're looking for a new family vehicle, it's worth checking if it comes with a full-size spare. You can explore some of the best family cars that offer this often-overlooked feature.
Re-Torque the Lug Nuts After a Short Drive
This is the final, crucial step that almost everyone forgets. After you've driven for about 25 to 50 miles, you need to pull over and tighten the lug nuts again. As the wheel settles onto the hub, the nuts can become slightly loose.
You can use the lug wrench that came with the car, but if you have a torque wrench, that’s the pro move. Your owner’s manual will tell you the exact torque specification for your vehicle. Tightening them to the right spec ensures that wheel is on there solid.
Doing this gives you the peace of mind that the job is truly done right. Now you can focus on getting that flat tire repaired or replaced and getting back to your normal routine, confident and prepared.
Common Questions Dads Have About Changing a Tire
Alright, even with a step-by-step guide, you're going to have a few questions. It’s completely normal. Let’s tackle some of the most common things that pop up when you're on the side of the road, staring at a flat. Getting these sorted out now will give you the confidence to handle it when it happens for real.
We'll get into the nitty-gritty here—from how tight is "tight enough" for those lug nuts to whether you can even think about jacking up the car on a slight hill.
How Tight Should the Lug Nuts Be?
This is the big one, and getting it right is all about safety. When you’re tightening the lug nuts on the spare tire, the goal is to get them as snug as you possibly can with the lug wrench while the car is still on the jack. Once you lower the car, give them one final, solid crank in that star pattern. You want them good and tight.
But here’s the pro tip: that’s not the final step. To do this job right, you need a torque wrench. Your owner’s manual will list the exact specification for your vehicle, measured in foot-pounds (ft-lbs). After you've driven about 25 to 50 miles on the spare, you absolutely must pull over and re-torque them. This final check is non-negotiable—it ensures the wheel is properly seated and secure for the road ahead.
How Long Can I Drive on a Spare Tire?
Think of that small "donut" spare as a temporary patch. It’s designed to get you off the shoulder and to a tire shop, not to continue your cross-country road trip. Just remember the 50/50 rule.
- Don’t drive over 50 miles per hour.
- Don’t drive for more than 50 miles total.
These little tires have minimal tread and can’t handle the heat or stress of normal driving. Your car’s braking and handling will feel off. The only goal is to get somewhere you can get a real tire put on. End of story.
A donut spare is your lifeline, not a replacement. Its only job is to get you from the point of failure to a service station. Pushing its limits puts your family and everyone else on the road at risk.
Knowing this stuff is vital, especially when you've got precious cargo in the back. A staggering 75% of flat tires happen on highways, and roadside assistance calls shot up by 15% in 2023. Getting the tire change procedure right can prevent up to 90% of related accidents—a statistic every dad should take to heart. You can see more about recent market trends on Michelin's investor site.
What If My Lug Nuts Are Stuck?
A lug nut that won't budge is a classic roadside headache. It’s usually caused by rust or a mechanic who went a little too crazy with an impact wrench. Just trying to muscle it off rarely works.
First, check your tool. The L-shaped wrench that comes with most cars is barely adequate. A cross-shaped or telescoping lug wrench will give you much more leverage, which is what you really need.
If a better wrench isn't enough, try this:
- Get Some Lubricant: A spray like WD-40 or PB Blaster is your best friend here. Spray it right at the base of the nut where it meets the stud. Give it a good 10-15 minutes to soak in and do its thing.
- Use Your Weight Smartly: Position the wrench so it’s horizontal, and then use your foot to apply steady, firm pressure downwards. Don't jump on it. That’s a great way to strip the nut or have the wrench fly off.
Once it breaks free, just wipe off any extra lubricant before you put the spare on.
Is It Safe to Change a Tire on a Hill?
Let me make this simple: No. Trying to change a tire on any kind of slope is incredibly dangerous. The risk of the car rolling or sliding right off the jack is just too high to even consider.
Jacks are designed for one thing: lifting a car straight up on flat, solid ground. A hill messes with the center of gravity and can cause the jack to buckle or slip. Even with the parking brake on and wheels chocked, you're fighting a losing battle against physics.
If you get a flat on an incline, this is the plan:
- Turn on your hazard lights immediately.
- If you can, coast the car slowly and carefully to a level spot.
- If you're stuck, just call for professional roadside assistance.
Your safety is worth more than any delay. Don't take the chance. And if you're in the market for a new family vehicle, our guide on navigating the car buying process has some tips you might find useful.
What if I Have Run-Flat Tires?
Run-flat tires are a game-changer. They have reinforced sidewalls that can hold up the car even with zero air pressure. If your car has them, you probably won't even find a spare or a jack in the trunk.
So, what do you do? When a dashboard light tells you a run-flat is punctured, your job is not to change it. Instead, you need to:
- Immediately slow down to under 50 mph.
- Take it easy on the brakes and avoid sharp turns.
- Drive cautiously to the nearest service center that can handle run-flats.
Most run-flats give you about 50 miles of range after a puncture, which is more than enough to get you somewhere safe without having to do a thing on the side of the road.
At alphadadmode.com, we're creating a community for dads who want to master practical skills. Sign up for our newsletter to get the latest updates, promotions, and news as we get ready to launch. Be the first to know what we're building at https://alphadadmode.com.